
Most companies configure Vanta backwards. They connect integrations first, watch tests turn green, and only then ask which framework they are actually being audited against. By the time the auditor asks for the observation window start date, half the account needs to be rebuilt. The order you set things up in Vanta matters almost as much as what you set up, and getting it wrong costs weeks you do not have before a first audit.
This checklist walks through the sequence that actually holds up under audit: the decisions to make before you touch the platform, the sequence of configuration inside it, and the final readiness checks before you hand the account to an auditor.
Why a Vanta Implementation Checklist Matters Before Your First Audit
Vanta is compliance automation software, not a compliance program. It monitors, syncs, and flags. It does not decide your scope, pick your framework, or tell you when your observation window can safely begin. Those calls are yours, and if you make them after connecting integrations rather than before, you end up rescoping mid-implementation, which resets test history and pushes your audit timeline back by weeks.
A first-time implementation typically runs six to twelve weeks from account creation to a fully passing test suite, depending on how much of the underlying control environment already existed. Companies that skip the pre-implementation planning stage and jump straight into connecting AWS and Okta tend to discover, three weeks in, that half their integrations are out of scope, their policies do not match their actual operations, and their observation window needs to restart.
Pre-Implementation: Foundational Decisions to Make First
Define Your Target Framework (e.g., SOC 2, ISO 27001, HIPAA)
Every downstream Vanta setting, from which integrations you connect to which policies you publish, depends on the framework you are pursuing. SOC 2 Type II evaluates your controls against the AICPA’s five Trust Services Criteria, security, availability, processing integrity, confidentiality, and privacy, with security as the only mandatory category. ISO 27001 asks you to build a full Information Security Management System (ISMS) under a structured set of clauses, backed by a broader set of technical, physical, and organizational controls in Annex A. HIPAA and PCI DSS bring their own control sets tied to specific data types, protected health information and cardholder data, respectively.
If your customers are asking for a specific report, let that drive the decision rather than defaulting to whichever framework has the most templates in Vanta’s library. A fintech company with enterprise banking customers may need SOC 2 first and PCI DSS second. A healthcare SaaS vendor almost always needs HIPAA regardless of what else it pursues. Mapping frameworks to actual customer and contractual requirements before configuration saves you from scoping controls you will never use.
Important: Choosing multiple frameworks at once is common, but sequencing them wrong creates duplicate work. Configure your primary framework fully, get through a full observation cycle if pursuing Type II, and add secondary frameworks once your evidence collection habits are established. Vanta will map shared controls across frameworks automatically, but only once both are active in the account.
Set Your Audit Timeline and Observation Window
If you are pursuing SOC 2 Type I, there is no observation window. The audit evaluates whether your controls are designed correctly as of a single point in time, and you can move to audit as soon as your tests pass. SOC 2 Type II is different: the observation window, also called the audit window or monitoring period, is the span during which the auditor samples evidence to confirm your controls actually operated, not just that they existed on paper. For a first Type II audit, a three to six month window is standard. Mature organizations settling into an annual cadence typically move to a full twelve-month window once they have proven consistent operation.
Do not start the observation window until you are confident your controls are actually running as designed. Auditors can sample any event from the first day of the window forward, and a control failure in week two of a six-month window is just as damaging to your report as one in week twenty. This is the single most common timeline mistake first-time customers make in Vanta: they start the clock the day they finish connecting integrations, before policies are published, before HR sync is confirmed, and before access reviews have actually happened once.
Identify Internal Owners and Stakeholders
Every control needs a named owner inside Vanta, not a department. “Engineering” is not a control owner. The engineering manager who reviews production access quarterly is. Before you start configuring, map out who owns identity and access management, who owns vendor risk, who owns HR onboarding and offboarding, and who owns policy publication and employee acknowledgment. If your organization is small enough that one person wears several of these hats, that is fine, but it needs to be explicit in the tool, because Vanta’s task assignments and reminder emails route based on these ownership fields.
Choose Your Auditor Before You Configure Vanta
Auditor selection affects configuration choices that are expensive to reverse. Different CPA firms and ISO certification bodies have different tolerances for exceptions, different expectations around evidence formatting, and different preferences on how granular your control mapping should be. Get your auditor engaged, or at minimum shortlisted, before you finalize your framework scope and observation window in Vanta. Some firms will do a pre-audit readiness call that surfaces scoping issues Vanta’s automated checks will not catch, like whether a particular subprocessor needs to be in scope.
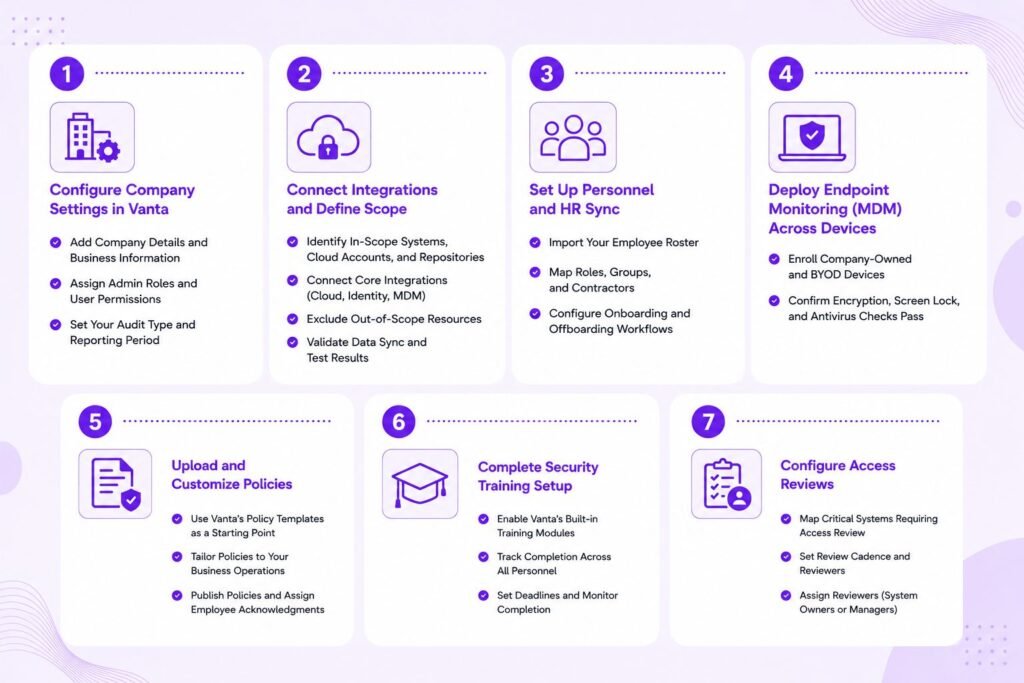
Step 1: Configure Company Settings in Vanta
Add Company Details and Business Information
Start with the basics: legal entity name, headquarters address, description of the service you provide, and the systems that process customer data. This becomes the backbone of your system description, the narrative document that accompanies your SOC 2 report and explains what your company does and how the in-scope systems support it. Getting this wrong early means rewriting the system description later, which auditors will flag as a scope change.
Assign Admin Roles and User Permissions
Set up role-based access inside Vanta itself before inviting a wider group of employees. Admin access should go to the small group of people responsible for the overall implementation, typically someone from security or IT leadership plus whoever owns compliance operations. Contributor-level access, limited to specific controls or tasks, should go to control owners identified in the pre-implementation phase. Over-permissioned access inside your compliance tool is its own finding waiting to happen.
Set Your Audit Type and Reporting Period
Confirm inside Vanta whether you are configuring for Type I or Type II, and if Type II, enter the observation window dates you settled on in the pre-implementation stage. This setting drives which evidence collection cadence Vanta applies and when it starts flagging tests as failing versus simply not-yet-configured.
Step 2: Connect Integrations and Define Scope
Identify In-Scope Systems, Cloud Accounts, and Repositories
Before connecting anything, list every cloud account, code repository, identity provider, and SaaS tool that touches customer data or the infrastructure that processes it. Separate this list into in-scope and out-of-scope categories with a documented rationale for each exclusion. A dev sandbox with no production data flowing through it might reasonably sit outside scope. A staging environment that mirrors production data usually should not.
Connect Core Integrations (Cloud, Identity, MDM)
Connect your cloud provider, whether AWS, GCP, or Azure, your identity provider such as Okta, Google Workspace, or Azure AD, your HR system, your task tracker like Jira or Asana, and your mobile device management tool in that order. Cloud and identity integrations feed the largest share of automated tests, so getting those connected and syncing correctly early gives you the longest runway to catch and fix configuration issues before the observation window starts.
Pro Tip: Connect integrations in a dedicated Vanta
Connect integrations in a dedicated Vanta project or sandbox pass first if you have a complex multi-account cloud setup. Validate that Vanta is reading the correct accounts before committing to the observation window start date. A misconfigured integration that silently excludes a production AWS account from monitoring is far harder to catch after the fact than before.
Exclude Out-of-Scope Resources
Vanta will pull in every resource an integration can see by default. Use the scoping and exclusion settings to remove systems that fall outside your defined boundary from the pre-implementation stage. Skipping this step is one of the fastest ways to fail tests for systems that were never supposed to be in scope in the first place, which inflates your remediation backlog with work you do not actually need to do.
Validate Data Sync and Test Results
Give each integration 24 to 48 hours to fully sync, then review the initial test results. Do not assume a green checkmark means the integration is reading everything correctly. Spot-check a sample of resources against what you know exists in the underlying system. A common failure mode is an integration connecting with read permissions too narrow to see the full resource inventory, which produces a passing test on an incomplete dataset.
Step 3: Set Up Personnel and HR Sync
Import Your Employee Roster
Connect your HR system so Vanta has an authoritative source for who is employed, in what role, and since when. This roster underpins background check tracking, training completion, and access review scoping.
Map Roles, Groups, and Contractors
Distinguish full-time employees from contractors, since some frameworks apply different requirements to each. Group employees by department or access tier so that later steps, particularly access reviews and training assignment, can be scoped efficiently rather than applied as one flat list.
Configure Onboarding and Offboarding Workflows
This is one of the most heavily sampled control areas in any audit. Auditors routinely pull a sample of terminated employees and check whether access was revoked within the policy-defined window, often 24 hours. Configure Vanta’s offboarding workflow to actually trigger deprovisioning tasks, not just log that an employee left. A workflow that only notifies IT without enforcing a deadline will still show gaps when sampled.
Step 4: Deploy Endpoint Monitoring (MDM) Across Devices
Enroll Company-Owned and BYOD Devices
Every device that accesses in-scope systems needs to be enrolled in your MDM tool and connected to Vanta. This includes personal devices under a BYOD policy if those devices can reach production systems or customer data. Devices that fall outside monitoring but still have access represent an unmonitored path into your environment, and auditors will ask about exactly this gap.
Confirm Encryption, Screen Lock, and Antivirus Checks Pass
Once devices are enrolled, Vanta checks disk encryption, screen lock timeout, and antivirus status automatically. Run this before the observation window opens, not during it, since fixing a non-compliant device mid-window still leaves a gap in the evidence trail for the days it was out of compliance.
Step 5: Upload and Customize Policies
Use Vanta’s Policy Templates as a Starting Point
Vanta’s template library covers the standard set: information security policy, access control policy, incident response plan, business continuity plan, and others tied to your selected framework. Start from these rather than drafting from scratch, but treat them as a first draft, not a final document. The NIST Cybersecurity Framework is a useful cross-reference when tailoring policy scope to real operational risks.
Tailor Policies to Your Business Operations
Generic templates describe generic companies. If your incident response policy references an escalation process your team does not actually follow, that mismatch becomes a finding the moment an auditor asks you to walk through a real incident. Edit every policy so it reflects what your team actually does, not what would look good on paper.
Insider Note: Auditors read policies and then interview staff to see if practice matches the document. A polished policy that nobody on the team can describe accurately is a worse outcome than a simpler policy everyone actually follows. Keep the language close to how your team really operates.
Publish Policies and Assign Employee Acknowledgments
Once finalized, publish policies through Vanta and assign acknowledgment tasks to all relevant employees. Track completion before the observation window starts, since unacknowledged policies at the start of the window suggest the policy was not actually in effect from day one.
Step 6: Complete Security Training Setup
Enable Vanta’s Built-in Training Modules
Vanta includes built-in security awareness training covering general security hygiene, and role-specific modules for engineers handling code and infrastructure. Enable the modules relevant to your framework and assign them by role or department.
Track Completion Across All Personnel
Set a completion deadline and monitor the dashboard rather than assuming reminder emails alone will drive completion. Training completion is a near-universal sampling target in audits, and a handful of stragglers at the end of the observation window is a common, easily avoidable finding. The Verizon Data Breach Investigations Report consistently ties a significant share of incidents to the human element, which is exactly why auditors weight this so heavily.
Step 7: Configure Access Reviews
Map Critical Systems Requiring Access Review
Identify every system where access grants matter, cloud infrastructure, code repositories, customer databases, and internal admin tools, and confirm each is connected so Vanta can pull current access lists automatically.
Set Review Cadence and Reviewers
Quarterly access reviews are the common baseline for most frameworks, though some organizations run them more frequently for highly sensitive systems. Assign a specific reviewer, generally the system owner or manager, rather than routing all reviews to a single security team member who lacks context on who should actually have access to each tool.
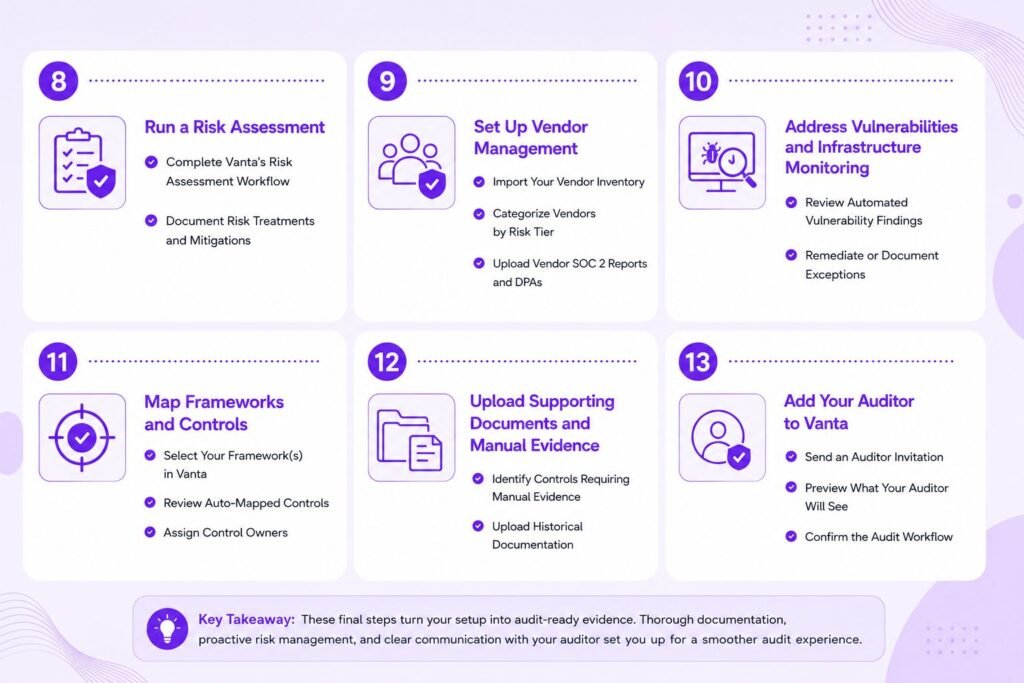
Step 8: Run a Risk Assessment
Complete Vanta’s Risk Assessment Workflow
Work through Vanta’s guided risk assessment to build out your risk register, identifying threats to confidentiality, integrity, and availability across your systems and rating likelihood and impact for each.
Document Risk Treatments and Mitigations
For every identified risk, document whether you are mitigating, accepting, transferring, or avoiding it, and what specific control addresses it. An unresolved risk with no documented treatment plan is one of the more common gaps auditors flag, since it suggests the assessment was completed as a checkbox exercise rather than an operational one.
Step 9: Set Up Vendor Management
Import Your Vendor Inventory
List every third-party vendor that has access to your systems or processes customer data on your behalf, from cloud infrastructure providers to smaller SaaS tools used by individual teams.
Categorize Vendors by Risk Tier
Not every vendor warrants the same scrutiny. A payroll processor handling employee financial data carries different risk than a project management tool with no access to customer data. Tier vendors by the sensitivity of what they access, and apply a proportionate level of due diligence to each tier.
Upload Vendor SOC 2 Reports and DPAs
For higher-tier vendors, collect their own SOC 2 reports and data processing agreements (DPAs) and upload them into Vanta. This is part of third-party risk management, often abbreviated TPRM, and demonstrates that your vendor oversight is not just a spreadsheet nobody revisits.
Step 10: Address Vulnerabilities and Infrastructure Monitoring
Review Automated Vulnerability Findings
Once your cloud and code repository integrations are connected, Vanta surfaces vulnerability findings automatically. Review these on a set cadence rather than letting them accumulate silently in the background. Cross-referencing findings against the National Vulnerability Database helps triage severity when Vanta’s default ratings feel too generic for your environment.
Remediate or Document Exceptions
Fix what you can fix. For findings that cannot be resolved immediately, whether due to a vendor patch not being available or a business dependency on a legacy configuration, document a formal exception with a rationale and a target remediation date. An undocumented, unaddressed critical vulnerability sitting in the account when the observation window opens is one of the more damaging findings an auditor can surface.
Step 11: Map Frameworks and Controls
Select Your Framework(s) in Vanta
With the foundational work done, formally select your framework or frameworks inside Vanta’s control mapping interface. This activates the specific control set your tests, policies, and evidence will be evaluated against.
Review Auto-Mapped Controls
Vanta auto-maps your connected integrations and completed tasks to relevant controls, but the mapping is not always perfect for edge cases specific to your environment. Review the full control list rather than assuming automation caught everything correctly.
Assign Control Owners
Every control needs a named owner responsible for keeping the underlying evidence current. This should map back to the stakeholder list built during pre-implementation, not be assigned arbitrarily at this later stage.
Step 12: Upload Supporting Documents and Manual Evidence
Identify Controls Requiring Manual Evidence
Some controls cannot be automatically monitored through an integration, board meeting minutes demonstrating security oversight, for example, or a signed business associate agreement. Identify these early rather than discovering them during the audit itself.
Upload Historical Documentation
If you have documentation predating your Vanta implementation that demonstrates a control was already in place, upload it. This can extend your effective evidence trail backward and, in some cases, support starting your observation window earlier than the date you connected Vanta.
Step 13: Add Your Auditor to Vanta
Send an Auditor Invitation
Once your account is substantially configured and tests are passing, invite your chosen auditor into Vanta with the appropriate access level. This gives them direct visibility into evidence rather than requiring manual exports.
Preview What Your Auditor Will See
Before sending the invitation, review the account from an outside perspective. Check that the system description is accurate, that excluded resources have documented rationale, and that no stale test failures are sitting unaddressed.
Confirm the Audit Workflow
Align with your auditor on how they intend to work inside Vanta versus requesting documents outside it, and confirm the expected timeline for fieldwork once your observation window closes or, for Type I, once your tests are passing.
Final Pre-Audit Readiness Checklist
Verify All Tests Are Passing (or Documented Exceptions)
A test failure with no documented exception looks like negligence to an auditor. A test failure with a documented exception, a remediation plan, and a target date looks like an organization that understands its own risk posture. Close this gap before the audit starts, not during it.
Confirm Observation Window Start Date
Double-check that the observation window dates configured in Vanta match what you agreed with your auditor. A mismatch here creates confusion during fieldwork that is entirely avoidable with a five-minute check beforehand.
Freeze Scope Changes Before the Window Opens
Avoid adding major new systems, vendors, or infrastructure changes right before the observation window opens. Scope changes reset evidence history for the affected controls and can undermine the continuity an auditor is looking for.
Common Setup Mistakes to Avoid Before Your First Audit
The mistake that costs the most time is starting the observation window before policies are published and acknowledged. The second most common is connecting every available integration without excluding out-of-scope resources, which inflates the remediation backlog with irrelevant work. A close third is assigning control ownership to departments instead of named individuals, which leaves nobody accountable when evidence goes stale. Each of these is avoidable with the sequencing outlined above: decisions before configuration, configuration before scope, scope before the observation window.
Getting the Vanta implementation right before your first audit is less about mastering every setting in the platform and more about making the right decisions in the right order. Frameworks, timelines, and ownership come first. Integrations, policies, and evidence collection follow. The observation window opens only once the underlying controls are actually operating, not just configured. Companies that follow this sequence walk into their first audit with a clean test suite and a clear story, instead of a scramble to explain gaps that a different order of operations would have prevented.
Frequently Asked Questions
How long does a Vanta implementation take before the first audit?
Most first-time implementations take six to twelve weeks to get from initial configuration to a fully passing test suite, not counting the observation window itself for a Type II audit. Organizations with an existing, mature control environment can move faster; those building controls from scratch should expect the longer end of that range.
Can I start the observation window before all tests pass?
Technically yes, but it is not advisable. Any test failing at the start of the window represents a control gap the auditor can sample against for the full duration. Most organizations wait until the test suite is fully green, or has only documented exceptions, before starting the clock.